Building a simple todo Rails app - Part 1
Planning a Rails app
$ cd dev
$dev rails new got_to_do_app
Step 1 - What my app will do
The plan is to build an app that simply allows users to write a todo list. There are many features I intend to implement but initially I will just get a basic version up and running and then later add further functionality to it. This will be my test app - my Rails playground.
The initial feature set will allow a user to:
- Register and Log in
A User will comprise a name, email and mobile number - Add a ToDo task
A ToDo task will include a title, description, deadline and timestamps of creation date and updated date - Comment on Todo items
A Comment will include a comment - Assign categories to Todo items
A category will include a name
Future iterations will include the ability to:
- Add someone to a Todo item
- Send email and possibly sms notifications
Step 2 - Building out the database and associations
Rails apps work on a Model, View, Controller principle or MVC for short. This breaks down the tasks of the apllication into three parts each with their own job. The View renders and sends a completed webpage from the server to the user once it has gathered all the information it needs from the database, via the Model, which they get from the Controller. It’s easy to visualize with the diagram below.
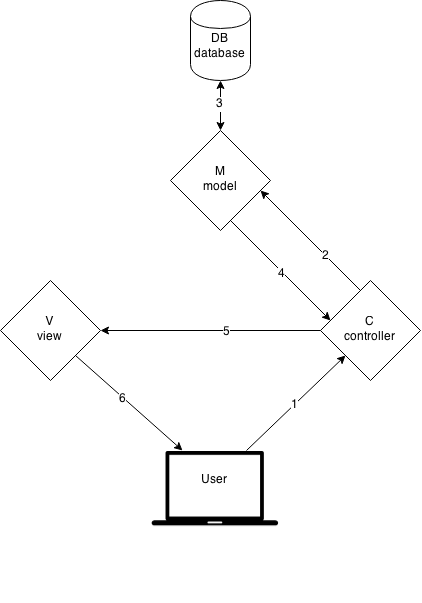
For this post we are focusing on the Model and the Database and we’ll leave controllers and views until a later post.
Before creating the tables in a database to contain the data we need, we need to visualize what we want to store and how our data relates to each other.
You can do this on a peice of paper just to sketch out the idea.
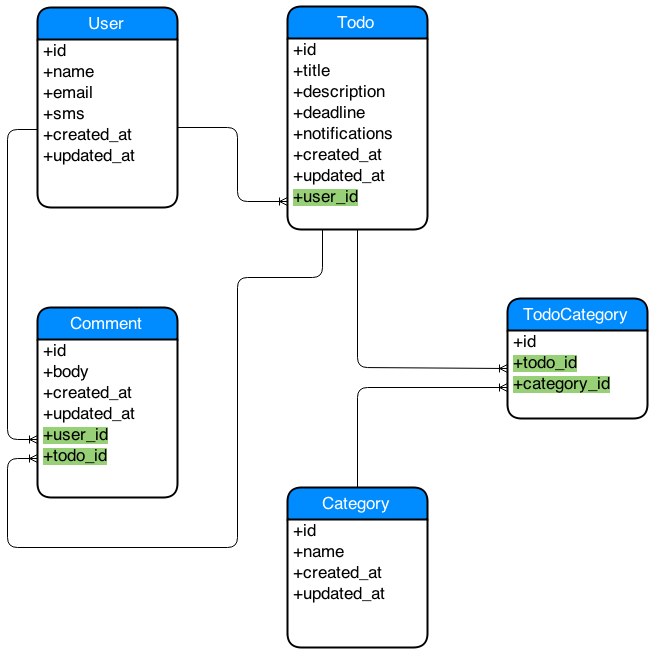
The elements of the app have been split into 4 tables plus a join table ( I’ll explain the join table shortly ). This diagram helps us with four tasks when building our database tables and building the relationships between each table in the database.
- The boxes represent each table in our database
- The columns in a table are the elements within each box ( id, name, created_at… )
- The lines that connect the boxes show relationships ( Associations )
- Establishes where we need foreign keys
Foreign Keys
We need two things to make an association, one at the database layer and the other in the model layer. Lets suppose we have created a User called Charlie. Charlie creates a todo item with a title of ‘Do the shopping on way home’ and another one with the title ‘Remember to clean my room’. Already we can see that whilst Charlie ( User ) can have many Todo items a Todo item can only have and belong to one User. In order to create this behaviour in the database we must include what is called a ‘foreign key’ in the table that is on the one side of the agreement - the todos table.
The foreign key MUST be named correctly in order for the link to work. It must start with the singular version of the table name followed by an underscore and id like so: user_id ( shown in the diagram above ). Rails will assume that there is a table named users with a column name of id and this will provide the first part of the link.
To summarise:
- A User has many todos and has many comments
- A Todo belongs to a User and has many comments and has many categories
- A Comment belongs to a User and belongs to a Todo
- A Category has many todos
We can pretty much cover all of these points the same way that we did the User-Todo relationship using the foreign key but there is one relationship that doesn’t follow the one to many (1:M) pattern. A Todo can have many categories and a Category can have many todos. This is called a many to many (M:M) association and requires a join table to deal with this type of relationship.
A join table here does the job of connecting the todos table and the categories table. The foreign keys reside in the join table and create a 1:M association from the join table to both the todos table and the categories table.
In part 2 we will build the tables and the models.